Building your own ergonomic standing desk on a budget is highly achievable, offering a practical solution to sedentary work habits without significant financial investment. With a little creativity and basic DIY skills, you can craft a personalized standing desk solution that perfectly fits your needs and wallet, often costing between $0 and $300 depending on the complexity and materials chosen. This guide provides practical ideas, material choices, and essential tips to construct your ideal standing workstation without breaking the bank.
Popular Types of DIY Standing Desks
Creating a standing desk on a tight budget often means exploring various DIY approaches. Depending on your current setup, skill level, and desired flexibility, one of these types might be the perfect fit for your home office. Each offers distinct advantages and challenges in terms of cost and construction.
Fixed-Height Converters or Risers
These are perhaps the simplest and most cost-effective DIY standing desk solutions. They involve elevating your existing monitor and keyboard on top of your current desk, transforming it into a standing workstation without altering the primary desk itself.
- Pros: Extremely budget-friendly, often using materials you already own. Requires minimal tools and time. No permanent changes to your existing furniture. Portable and easy to experiment with.
- Cons: Limited in terms of height adjustment (unless manually rearranged). May not look as integrated or aesthetically pleasing as a full desk. Stability can be an issue if not constructed carefully.
- Examples: Stacking sturdy books or reams of paper, using crates or small shelves, repurposing an ironing board, or even using a smaller IKEA side table placed on top of your main desk.
Fixed-Height Full Standing Desks
For those seeking a more permanent and integrated standing solution, building a full fixed-height standing desk from scratch is an excellent option. This allows for complete customization of height, dimensions, and aesthetics to suit your workspace perfectly.
- Pros: Highly stable and durable, as it’s built to a specific standing height. Offers a clean, integrated look. Allows for precise ergonomic customization based on your body measurements.
- Cons: Lacks sit-stand flexibility without an adjustable chair or stool. Requires more material and construction effort than a converter. Takes up dedicated space.
- Examples: Constructing a simple frame from inexpensive lumber (like 2x4s) or sturdy plumbing pipes (e.g., using Kee Klamp fittings) and topping it with a custom desktop made from plywood, an old door, or reclaimed wood.
Simple Adjustable DIY Desks
While motorized adjustable standing desks can be pricey, it is possible to build a DIY version with some level of manual adjustability. This often involves more complex construction or sourcing specific components, but it offers the best of both worlds: the health benefits of varied postures and the satisfaction of a DIY project.
- Pros: Provides the flexibility to switch between sitting and standing, crucial for long-term ergonomic health. Offers more versatility for different users or changing needs.
- Cons: Generally more expensive and challenging to build than fixed-height options. May require purchasing specific adjustable legs or a manual crank mechanism, impacting the “tight budget” aspect. Stability can be a concern if mechanisms are not robust.
- Examples: Using plumbing pipes with adjustable Kee Klamp fittings that can be loosened and retightened to change height, or combining a budget-friendly manual crank frame with a custom-made desktop.
How to Build a DIY Standing Desk on a Budget (Buying Guide)
Embarking on a DIY standing desk project requires careful planning to ensure it meets your ergonomic needs without overspending. From conceptualizing your ideal workspace to selecting the right materials, each step is crucial for a successful and budget-friendly build.
Define Your Workspace Needs
|
Our Picks for the Best Standing Desk in 2026
As an Amazon Associate I earn from qualifying purchases.
|
||
| Num | Product | Action |
|---|---|---|
| 1 | Adjustable Standing Desk with Cable Management, 48 X 24 Inches Electric Stand Up Desk, 176LBS Load, 2 Memory Preset Height Table for Home Office Work with Splice Board (Rustic Brown Desktop) |

|
| 2 | Huuger 55 x 28 Large Electric Standing Desk, Height Adjustable Computer Desk, 27.6" Deep Desktop, Stand up Gaming Office Table with 2 Hooks, 3 Preset Heights, for Home Office, Black |
|
| 3 | HUANUO 32" Small Electric Standing Desk Adjustable Height, 4 Memory Height Settings, Sit Stand Up Desk for Home Office & Computer Workstation, LightWalnut |
|
| 4 | ERGOMAKER 63" Electric Standing Desk, Adjustable Height, Sit Stand Up Desk for Home Office & Computer Workstations, Memory Controller, White |
|
| 5 | Small Height Adjustable Electric Standing Desk, 31.5" x 23.6" Sit Stand up Desk with Splice Board, Ergonomic Rising Computer Home Office Desk Table with Memory Preset, White Frame/White Top |
|
| 6 | HUANUO Electric Small Standing Desk, 35" x 20" Whole Piece Desktop, Adjustable Height Computer Desk, 4 Height Memory Settings, Sit Stand Up Desk for Home Office, White |
|
| 7 | Standing Desk, Height Adjustable Electric Stand up Desk, 55 x 24 Inches Sit Stand Home Office Desk with Splice Board, Black Frame/Black Top |
|
| 8 | ERGOMAKER Electric Standing Desk, 67" x 23.6" Height Adjustable Sit Stand Desk with Splice Board for Home Office, Computer Table Memory Preset (White Frame, White Desktop) |
|
| 9 | Marsail Glass Standing Desk with Drawer 37 x 22 Inches Stand up Desk Standing Desk Adjustable Height with One-Piece Tempered Glass Top, Ergonomic Home Office Desk with 4 Preset Heights White |
|
| 10 | Kingant Standing Desk Height Adjustable Small Electric Stand Up Desks [35 x 20 Inch] - Ergonomic Sit Stand Desk Rising Desks for Home Office Computer Desk Stand Desk Workstation with Cable Management |
|
Before you cut the first piece of wood or stack the first book, consider how you intend to use your standing desk. Will it be for a laptop, multiple monitors, or a desktop computer? What are the dimensions of your available space, and how much surface area do you truly need? Your daily tasks and equipment will dictate the necessary size and stability of your DIY solution. Think about whether you need integrated storage, cable management, or simply a flat surface for your work essentials.
Select Budget-Friendly Materials
The cost of materials is often the largest variable in a DIY project. Prioritize affordability without compromising on stability and durability.
- Desktop Surfaces:
- Plywood or MDF: These are excellent choices for a custom desktop. They are relatively inexpensive, widely available, and can be cut to any size or shape. You can paint, stain, or veneer them for a finished look.
- Reclaimed Wood/Old Doors: Check local salvage yards, Facebook Marketplace, or even curbside for old doors, tabletops, or sturdy pieces of wood that can be repurposed.
- IKEA Tabletops:: Often a go-to for DIYers, IKEA offers various affordable tabletop options that can be combined with custom legs.
- Legs and Frames:
- Lumber (2x4s, 2x8s): Simple wood frames can be built from common, inexpensive lumber. These offer good stability for fixed-height desks.
- Plumbing Pipes and Fittings: Galvanized or black iron pipes with Kee Klamp or similar fittings offer a sturdy, industrial aesthetic. While fittings can add up, they provide a strong, customizable frame, and some fittings even allow for manual height adjustments.
- Existing Furniture: For converters, leverage what you already have – sturdy boxes, old crates, or robust stacks of books.
Design for Optimal Ergonomics
A standing desk is only beneficial if it’s set up correctly for your body. Proper ergonomics prevent strain and maximize comfort and productivity.
- Ideal Height: When standing, your elbows should form a 90-degree angle with your forearms parallel to the floor, allowing your wrists to remain neutral while typing.
- Monitor Position: The top of your monitor screen should be at or slightly below eye level. This prevents neck strain from looking up or down too much.
- Keyboard and Mouse: Ensure your keyboard and mouse are at the same height as your elbows, allowing your shoulders to relax.
- Foot Position: Consider an anti-fatigue mat to ease pressure on your feet and back when standing for extended periods.
Gather Essential Tools
A tight budget often means working with basic tools. Most DIY standing desk projects can be completed with a few common items:
- Measuring tape
- Saw (hand saw, circular saw, or jigsaw for wood)
- Power drill with various bits
- Screwdriver set
- Level
- Safety glasses and gloves
If you don’t own these, consider borrowing them from friends or looking for affordable options at hardware stores. Factor in that the cheaper the materials, the more crucial sturdy construction and appropriate tools become to ensure stability.
Comparison Table: Budget DIY Standing Desk Approaches
Finding the perfect DIY standing desk on a budget means weighing different approaches. This table offers a quick comparison of common low-cost methods, highlighting their characteristics, ease of build, and estimated investment.
| Model/Approach | Type | Pros | Cons | Estimated Cost (USD) |
|---|---|---|---|---|
| Book Stack Riser | Converter | Free, instant, no tools needed | Unstable, unattractive, fixed height | $0 – $10 |
| Crate/Shelf Topper | Converter | Very low cost, easy to assemble | Fixed height, basic aesthetics | $10 – $50 |
| IKEA Kallax/Table Hack | Converter/Fixed | Affordable, relatively clean look, simple | Fixed height, limited customization | $30 – $100 |
| Basic Lumber Frame | Fixed Full Desk | Sturdy, highly customizable height | Requires woodworking skills, permanent | $50 – $150 |
| Pipe & Fittings Desk | Fixed/Adjustable | Industrial aesthetic, very strong, adaptable | Fittings can be pricey, heavier build | $100 – $300 |
The Compelling Benefits of a Standing Workspace
Transitioning to a standing desk, even a DIY one, is an investment in your health and productivity. The benefits extend far beyond simply changing your posture, impacting both your physical well-being and your mental acuity throughout the workday.
Improved Health and Well-being
Prolonged sitting has been widely recognized as a significant health risk. Incorporating standing into your daily routine can counteract many of these negative effects. Regularly switching between sitting and standing positions helps to alleviate chronic back and neck pain by reducing strain on your spine and encouraging better posture. It also boosts blood circulation, preventing blood from pooling in your legs and potentially reducing the risk of cardiovascular issues and deep vein thrombosis. Beyond these direct benefits, standing burns more calories than sitting, contributing to weight management and a more active lifestyle.
> “Modern office workers often spend long hours sitting, which can significantly impact both health and energy levels. Our bodies and minds function optimally when we are free to move throughout the day.” – Jon Paulsen, Certified Professional Ergonomist and Founder of UPLIFT Desk
Enhanced Productivity and Focus
Beyond the physical advantages, a standing desk can significantly improve your cognitive function and work output. Standing helps combat the afternoon slump, keeping you more alert and energized throughout the day. This increased vigilance can translate into better focus and concentration on tasks, leading to higher productivity and improved problem-solving skills. Studies have shown that workers who incorporate standing into their day report feeling less fatigued, more engaged, and more positive about their work. This improved mood and increased energy can also foster greater creativity and collaboration, making you a more effective and dynamic contributor to your team.
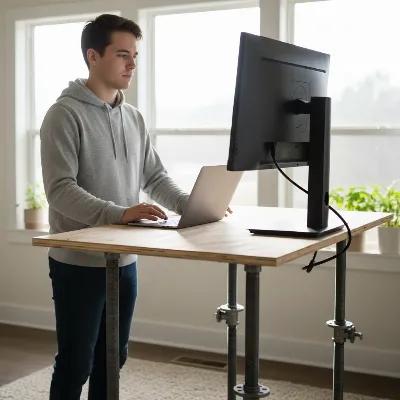 A person working happily at a simple DIY standing desk, made from budget materials like plywood and pipe, in a modern home office with natural light. The desk holds a laptop and a monitor.
Conclusion
Building your own standing desk on a tight budget is a highly achievable and rewarding project that offers a practical solution to sedentary work habits. Whether you opt for a simple converter using everyday items or construct a sturdy full desk from inexpensive materials like lumber or pipes, the journey empowers you to create a workspace tailored to your exact needs and financial constraints. The health and productivity benefits—from reducing back pain and improving circulation to boosting energy and focus—make it a worthwhile endeavor. By embracing a DIY approach, you not only save money but also gain a deeper appreciation for your ergonomic setup. So, why not take the first step towards a healthier, more active workday? What innovative materials will you use to craft your perfect standing sanctuary?
Frequently Asked Questions
Frequently Asked Questions
Is it truly cheaper to build a DIY standing desk than to buy one?
For simple fixed-height or manually adjustable solutions using repurposed or inexpensive materials, building a DIY standing desk is almost always more cost-effective. However, for complex adjustable desks, purchasing a basic standing desk converter might sometimes be cheaper than sourcing all new parts for a motorized DIY build.
What are the most budget-friendly materials for a DIY standing desk desktop?
Plywood, MDF (medium-density fiberboard), and reclaimed wood (like an old door or salvaged timber) are excellent and affordable options for a sturdy desktop. These materials can be easily cut, painted, or stained to match your aesthetic, with costs ranging from $0 to $100 depending on the source.
How do I determine the correct height for my DIY standing desk?
To ensure ergonomic comfort, stand with your feet flat on the floor and your arms hanging naturally at your sides. Your DIY standing desk's surface should be at a height where your elbows can comfortably form a 90-degree angle when your hands are on the keyboard, typically between 38 and 45 inches for most adults.
Can I make an existing desk into a standing desk without permanent changes?
Absolutely! This is the essence of a DIY standing desk converter. You can use stacks of books, sturdy crates, small shelves, or even another small, inexpensive table (like an IKEA side table) to elevate your monitor and keyboard on your current desk, often costing less than $50.
What are the key tools I'll need for a basic DIY standing desk?
For most budget-friendly DIY standing desk projects, essential tools include a measuring tape, a saw (hand or power), a drill, screwdrivers, and a level. Safety gear like glasses and gloves is also highly recommended to ensure a safe and successful build.
Is an ironing board a viable option for a temporary standing desk?
Yes, an ironing board can serve as a temporary and highly adjustable standing desk solution, thanks to its inherent height adjustment feature. It's particularly useful for laptops and can be easily folded away when not in use, making it a zero-cost option if you already own one.
Build a DIY Standing Desk on a Budget
Learn how to construct an ergonomic standing desk using budget-friendly materials and simple tools, tailored to your workspace needs and financial constraints.
Before starting, assess how you'll use the desk: laptop or multiple monitors? Measure your available space and determine the necessary surface area. Consider if you need integrated storage or cable management.
Choose affordable yet sturdy materials. For desktops, consider plywood, MDF, reclaimed wood, or IKEA tabletops. For legs and frames, use lumber (like 2x4s), plumbing pipes with fittings, or existing furniture like crates for converters.
Ensure the desk height allows your elbows to form a 90-degree angle with forearms parallel to the floor when standing. Position your monitor so the top of the screen is at or slightly below eye level. Keep your keyboard and mouse at elbow height.
Most budget DIY projects require basic tools: a measuring tape, a saw (hand or power), a drill with various bits, screwdrivers, a level, and safety glasses/gloves. Borrow tools if you don't own them to save costs.
Follow your design plan to assemble the desk, ensuring all connections are secure for stability. For fixed desks, securely attach the desktop to the frame. For converters, stack chosen materials to the desired ergonomic height, ensuring even weight distribution.
Get our weekly buyer guide
Practical specs, not advice. Unsubscribe anytime.
The ideas for building a DIY standing desk were really helpful. I appreciated the breakdown of different approaches. I ended up adapting the ‘desktop converter’ idea for my existing desk, which saved me a ton of money. The only minor complaint is that finding the right height for my monitors took a bit of trial and error, but that’s on me, not the guide.
I’ve been wanting a standing desk forever but couldn’t justify the price of a pre-made one. This guide was a lifesaver! I went with the fixed-height approach using some old IKEA shelves and a new desktop. It cost me under $100 and looks great in my home office. My back already feels so much better after just a week of using it.
I was excited about the idea of a DIY standing desk, especially the $0-$300 budget range mentioned. While the concepts are good, I found some of the material choices a bit hard to source locally without spending more than I wanted. I ended up having to compromise on the desktop material to stay within my budget, which was a bit disappointing. Still, it’s functional.
This was exactly what I needed! I’m not super handy, but the instructions for the simple ‘riser’ type desk were clear enough for me to follow. I used some sturdy crates I already had and just bought a nice piece of plywood for the top. It’s made a huge difference in my energy levels throughout the workday. Highly recommend trying one of these DIY solutions.